

I have been doing automation with VMware products for a while, this has been mostly using PowerCLI, which I have blogged about in the past. In the last few weeks I have started to work with configuring and working with vRealize Orchestrator and vRealize Automation, and the hands off automation in these products is carried out using their respective REST APIs.
REST is something I’ve pretty much had zero experience of, so I have had to pick this up from nothing and figure out how to work in this fashion. My plan is to do a series of blog posts around how to get started with working with these interfaces, configuring and working with these products, and with tips on where to start. I’ve had some great support from my fellow automation people at work, but think I have a relatively good grip on how to do things now.
REST stands for ‘Representational State Transfer’ and uses the HTTP protocol as its basic interface, with this being a standard way to do things now, and with ports 80 and 443 (and the security around using them) generally being well understood, this basically means you should not have any issues with applications requiring complex numbers of ports being open to your application servers. REST is becoming somewhat ubiquitous now, with seemingly every new of hardware and software being released coming with its own REST interface.
This is great for people wanting to automate because we do not need any special software to do REST calls, and we can access the API from pretty much any OS and from anywhere with HTTP/HTTPS access to the endpoint. A REST call basically comprises of the following components:
- URI (Uniform Resource Indicator) – basically a URL which exposes a function of the API, if you send a correctly crafted message to this address then you will get a standard HTTP response which should indicate whether your call was successful.
- Body – this is also known as the payload. This contains instructions on what we want to do, and will usually (in my experience) be in either JSON (JavaScript Object Notation), or XML (eXtensible Markup Language). These are both markup languages which allow you to define the parameters for what you want to do. If you are sending file type data then the body may also be in multipart MIME format.
- Headers – these carry information about the message you are sending such as data type, authentication information, desired response type, and are carried as a hash table of names and values.
- Method – REST uses standard HTTP methods and which method you use will depend on the API and function you are accessing. Primarily this will probably be one of the following:
- GET – this makes no changes, and is used for retrieving information. When you access a web page, the HTTP request uses the GET method, and by using this method with an API, you can generally expect to be returned an XML/JSON response with information about how a component is configured.
- POST – this is used for sending information to an API to be processed. Again, you should expect a return code for this, and even if this is an error, there should (depending on the call, and the API) be something meaningful telling you what went wrong
- PUT – often interchangeable with POST, this is generally used for replacing configuration in its entirety. Again you can reasonably respect some feedback when using this method.
- DELETE – removes configuration from a specific element or component.
The exact way in which the call is sent depends on the exact API being used, and this is where the API being well documented is of crucial importance, because if documentation is lacking, or just wrong (as is the case much more than it should be), then getting the call to be successful can be challenging.
To get started you will need a tool which can craft calls for you, and show the response received. When starting out, it is easiest for this to be a graphical tool which gives instant and meaningful feedback on the response, although this is not great for doing things in an automated and programmable fashion, this does make things simpler, and makes the learning experience easier.
If you use Chrome or Firefox then you should be able to easily find some REST clients, and it may well be worth trying a few different ones until you find one which works best for you. Postman was recommended to me, and this has a nice graphical UI which will do code highlighting on the response, and will help you to build headers and the like.
Ultimately, if you are looking to automate, then you will be using a built in way of sending REST calls from your chosen automation language. My experience of doing this is either from BASH scripts (I know, I know) where I use curl, or through PowerShell, where you have the Invoke-RestMethod or Invoke-WebRequest cmdlets.
When using these kind of tools (or indeed, doing any kind of programmatic REST call), you will need to form the header yourself. As I said above, this is basically a hash table of key-value pairs.
So let’s do an example REST call. For the example below, I will be using the vRealize Orchestrator 7.0 API. This is a pretty new release, but it can be downloaded from the VMware website, and is deployed from OVA, so should be quick to download and spin up. The new version has two distinct APIs: one for the new Orchestrator Control Center, which is used to configure the appliance, and one for the vRO application itself, used for orchestration of a vSphere (and beyond!) environment. I will show this using both PowerShell code, and the Postman GUI.
vRealize Orchestrator has a fairly straight forward API, you can access the documentation by opening your browser and going to ‘https://<vro_ip>:8281/vco/api/docs’, you will be presented with this screen:

From here we can explore any area exposed by the API, for the sake of this example we’re going to do something simple, we are going to return a list of the available workflows in the vRO system. So select ‘Workflow Service’, and click ‘GET /workflows’, and we can see a bit of information about the REST call to list workflows. This is what it shows:
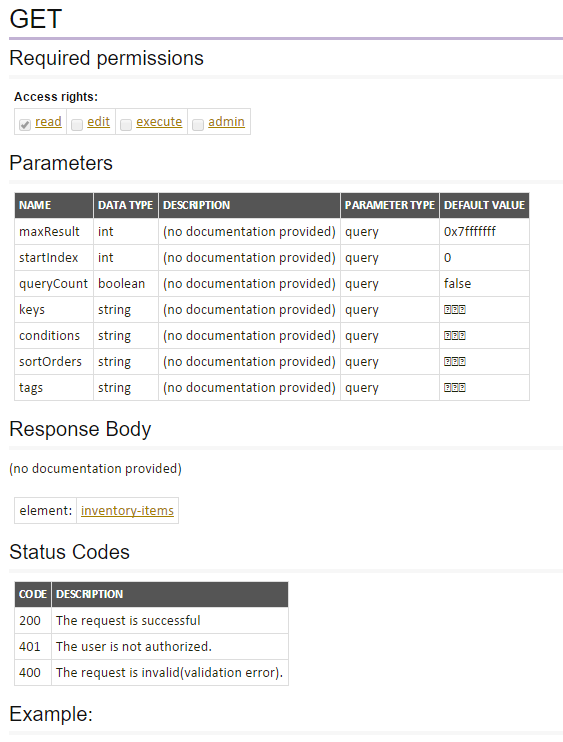
This being a ‘GET’ call, we don’t see a lot here, but we will run the call anyway, and see what we get back, in later articles we will go through changing configuration. First we will make the call using PowerShell, the script is as follows, this is pretty simple:
# Ignore SSL certificates

# NOTE: This should not really be required, if you are using

# proper certificates, and have working DNS

Add-type @"

using System.Net;

using System.Security.Cryptography.X509Certificates;

public class TrustAllCertsPolicy : ICertificatePolicy {

public bool CheckValidationResult(

ServicePoint srvPoint, X509Certificate certificate,

WebRequest request, int certificateProblem) {

return true;

}

}

"@

[System.Net.ServicePointManager]::CertificatePolicy = New-Object TrustAllCertsPolicy

# Define our credentials

$user_name = "vcoadmin";

$password = "vcoadmin";

$vro_server_name = "192.168.1.201"

# Convert the credentials to a format we can use in the

# header.

$auth = $user_name+":"+$password;

$Encoded = [System.Text.Encoding]::UTF8.GetBytes($auth);

$EncodedPassword = [System.Convert]::ToBase64String($Encoded)

$header = @{"Authorization"="Basic $($EncodedPassword)"};

# Define the URI for our REST call

$vro_getplugin_uri = "https://"+$vro_server_name+":8281/vco/api/plugins"

# Run the call and store the result in a variable

$get_plugins = Invoke-WebRequest -Uri $vro_getplugin_uri -Method Get -Headers $header -ContentType "application/json"
This returns the result of the call to a variable, unfortunately, although this is in JSON format, it will be horribly formatted if you try to output it:
If we run:
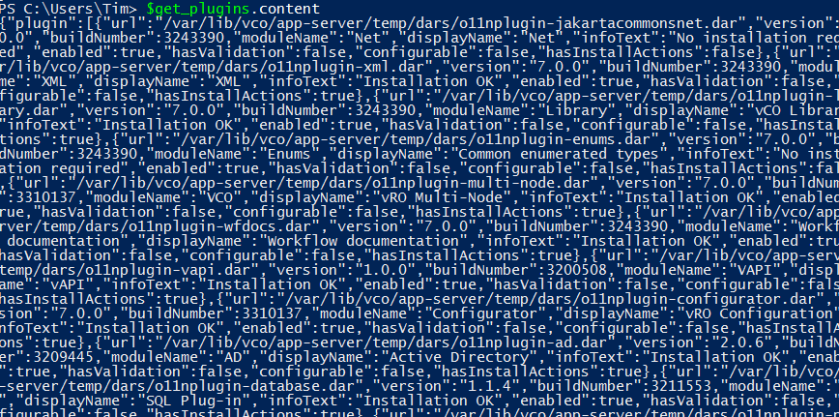
$get_plugins.content | ConvertFrom-Json | ConvertTo-Json
Then the built in JSON formatting will reformat it to make it readable:

This gives us a readable list that we can refer to, filter on, and do all the cool stuff that PowerShell makes simple.
We will now look at doing the same thing with Postman, so first you will need to install the Postman plugin from the Chrome App Store, then open it, you will see this:

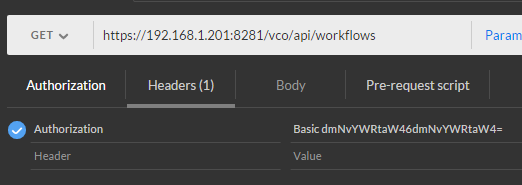
We know our credentials and URI, so we’re just going to go ahead and step through making the request. First, enter the URI in the box:

Now we need to add our authentication method, so change ‘No Auth’ to ‘Basic Auth’, enter the credentials for the ‘vcoadmin’ user, and click ‘Update request’:

You will notice that ‘Headers (0)’ changed to ‘Headers(1)’, if you click on that you can see the header for the request, with the encoded credential:
Now click ‘Send’ and our REST call will be submitted, the same JSON we got earlier will be nicely formatted and displayed in the lower pane:

And that’s a REST call completed, with the result returned, and we know how to do it using PowerShell, to make programmatic calls, and with Postman, to explore and understand APIs.

Hey, you should use Invoke-RestMethod instead of Invoke-WebRequest.
Invoke-RestMethod -Uri $vro_getplugin_uri -Method Get -Headers $header
This automatically returns Powershell objects instead of having to manually pipe it to the json cmdlets.
LikeLike
Very true, in this case it is better, I am torn between Invoke-WebRequest and Invoke-RestMethod because Invoke-RestMethod doesn’t return the response headers. I guess each is good in their own particular use case 🙂
LikeLike